
Language files are placed in the subfolder "languages" under the installed folder. The files are used for all templates.
To translate a language, duplicate the shipped english.xml and rename it. It is recommended that the file name should contain alphanumeric characters (and underscore) and in lowercase only.
Open the new XML file with any text or XML editor, you'll see the root node:
<ew-language date="2018/11/07" version="16.0.0" id="en" name="English" desc="English" author="e.World Technology Ltd.">
You must change at least the id, name and desc attributes.
The id is an identifier for identifying the language in generated scripts, it must be unique. It is recommended that you use the following values as the language IDs.
|
|
|
The name is for displaying the language name in the user interface (which does not support unicode), it should contain alphanumeric characters, underscore and spaces only.
The desc is for displaying the language name in generated scripts, it can be in the encoding of the XML file.
For example, if you want to make language file for Traditional Chinese, you may rename the file as chinese.xml and modify the node as:
<ew-language date="2018/11/07" version="16.0.0" id="zh-TW" name="Traditional Chinese" desc="繁體中文" author="e.World Technology Ltd.">
You can edit or even add your own phrases. Just open the language file with any text or XML editor, edit/add your <phrase> nodes. Make sure you provide an unique id to each phrase. The id must be alphanumerical only.
The phrases are not limited to text, you can also use CSS class, e.g.
<phrase id="FieldRequiredIndicator" class=quot;fa fa-asterisk ew-required"/>
Language file is an XML file, when you edit the file, make sure that you keep it well-formed. If you use HTML tags or special characters in the attributes of the XML tags, you need to use entity references. For example, to insert the > symbol, you need to use <. Make sure your characters are supported by the encoding of the XML file specified in the processing instruction node (the first line). You can load the file in your browser to check if the file is well-formed, if it is, the browsers should be able to load and display it without any errors.
Click [Tools] -> [Languages] to select the languages you want to use in the project. If more than one language is selected, a combobox will appear on the top of the generated scripts for user to select language.

If you want to use multi-language project, make sure you have enabled Multi-Language in the [ASP.NET]->[General] tab (see ASP.NET Settings).
Then, select a Default Language in the [ASP.NET]->[General] tab (see ASP.NET Settings).

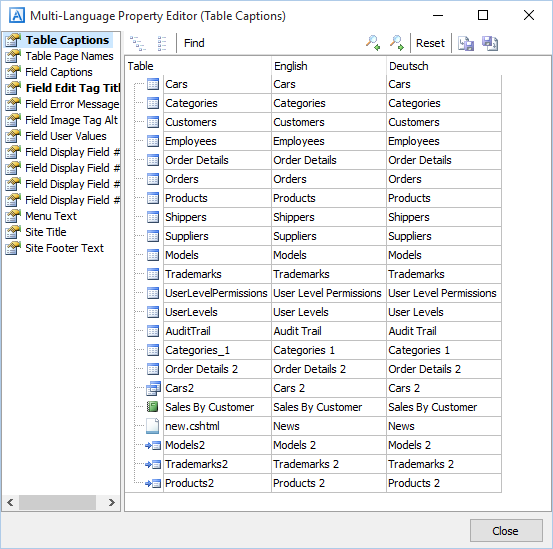
Some text properties support Multi-Language. This editor allows you to enter your property values for each language. Supported properties are:
To edit these properties, click [Tools] -> [Multi-Language Property Editor] to open the editor. Alternatively, you can also click the small button next to above properties in the user interface to open.

Select a property in the Property pane on the left to edit, then enter your properties in unicode. For example, you can copy and paste from Word.
The editor supports import/export of the phrases (of the mutli-language properties only, not including the phrases in the language files):

Click the export button to export the phrases to a XML file so you can edit the file with text or XML editor or share the file with other project. Click thie import button to choose the XML file that you want to import so you can quicky use edited phrases or easily reuse other project's XML file.
There is a subfolder named "html" inside the template archive (e.g. aspnet2019.zip) containing the following HTML email templates:
The content of these files are in English. To make email templates in other langauges, copy the files and rename the files and translate the content to the your languages. The files must be renamed as <original_file_name>_<language_id>.html. For example, the file nofify.html should be renamed as notify_zh-TW.html if the file is to be translated into traditional Chinese. The files must be saved wtih utf-8 encoding.
Remember to put the translated files back into the "html" subfolder of the template archive.
If you prefer to customize the language phrases by code, you can use the Language_Load server event. However, note that the Language_Load event cannot change the email templates, if you want to change the email content by server event, use Email_Sending server event to customize the Content property of the Email object. You can use the method CurrentLanguageID() to get the current language ID and write your code accordingly. See Server Events and Client Scripts for more details.