Database Settings
If you are not at the [Database] tab yet, clicking the  icon in the toolbar to go to [Database] tab. ASP.NET Maker can connect to Microsoft Access, Microsoft SQL Server, MySQL, PostgreSQL, Oracle and SQLite.
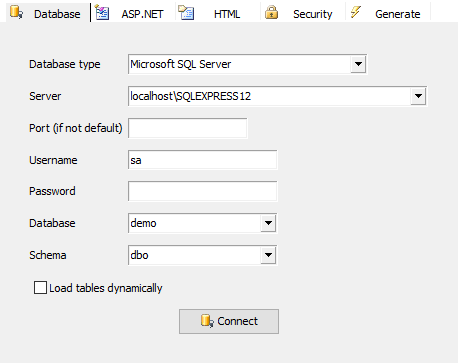
1. Microsoft SQL Server Setup
Note If you have installed SQL Server 2012 Native Client (x86) on your computer, then Microsoft
SQL Server database type will be available for selection. You can use this database type for connection to SQL Server 2005 or newer. (SQL Server 2000 or older are NOT supported.) You can download SQL Server 2012 Native Client from the Microsoft website. See System Requirements. (ODBC or the old OLE DB provider for SQL Server are NOT supported.)
- Select Microsoft
SQL Server as database type,
- Enter the name or IP of the SQL server,
- Enter the User ID and
Password,
- Select the database you want or
just enter the name of your database,
- Click the
 Connect button to load the database information.
Notes
- If Microsoft
SQL Server 2005 or newer, make sure the server name includes the instance name, if any, e.g. localhost/SQLEXPRESS.
- The server name or IP should be valid on your production Web server also. Otherwise you'll need to modify the generated connection string in appsettings.json before you upload it to your production server. For example, if you have a testing SQL Server installed on the same computer, you can use "(local)" as server name when you connect to it with ASP.NET Maker. The generated scripts will then try to connect to a SQL Server on the same computer as the production Web server, if this is not the case on the server, the connection will fail. It is common that SQL Server is installed on a different server in production environment.
- If you want to use trusted connection with integrated authentication, you can leave the username and password empty. However, note that in this case you'll need to make sure the Web sever user has appropriate access to the database. Otherwise, you will most likely see an error message such as "Login failed for user '(null)'. Reason: Not associated with a trusted SQL Server connection.", when you try to launch your ASP.NET application.
2. MySQL
- Select MySQL as database type,
- Enter the name or IP of the database server,
- Enter the User ID and
Password,
- Select the database you want or
just enter the name of your database,
- Click the
 Connect button to load the database information.
Note The server name or IP should be valid on your production Web server also. Otherwise you'll need to modify the generated connection string in appsettings.json before you upload it to your production server. For example, if you have a testing MySQL Server installed on the same computer, you can use "localhost" as server name when you connect to it with ASP.NET Maker. The generated scripts will then try to connect to a MySQL Server on the same computer as the production Web server, if this is not the case on the server, the connection will fail.

3. PostgreSQL
- Select PostgreSQL as database type,
- Enter the name or IP of the database server,
- Enter the User ID and
Password,
- Select the database you want or
just enter the name of your database,
- Click the
 Connect button to load the database information.
Note The server name or IP should be valid on your production Web server also. Otherwise you'll need to modify the generated connection string in appsettings.json before you upload it to your production server. For example, if you have a testing PostgreSQL Server installed on the same computer, you can use "localhost" as server name when you connect to it with ASP.NET Maker. The generated scripts will then try to connect to a PostgreSQL Server on the same computer as the production Web server, if this is not the case on the server, the connection will fail.

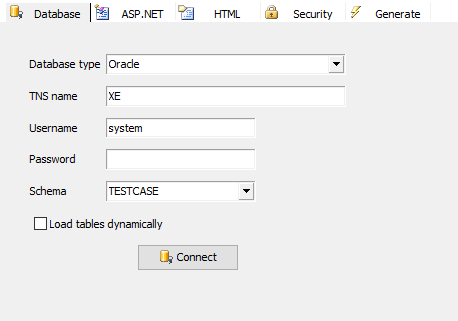
4. Oracle
Note If you have installed Oracle client on your computer, this database type will be available for selection. You can download Oracle client from the
Oracle website. Make sure the path of your Oracle client (e.g. oci.dll) is among the
Path variable under Windows
Environment Variables -> System variable.
- Select Oracle as database type,
- Enter the Oracle Service name,
- Enter the User ID and
Password,
- Select the Schema you want or
just enter the Schema name,
- Click the
 Connect button to load the database information.
Note The service name should be valid on your production Web server also. Otherwise you'll need to modify the generated connection string in appsettings.json before you upload it to your production server. The service name must be set to the appropriate Net8 name which is known to the naming method in use. For example, for Local Naming, it is the alias in the tnsnames.ora file; for Oracle Names, it is the Net8 Service Name.
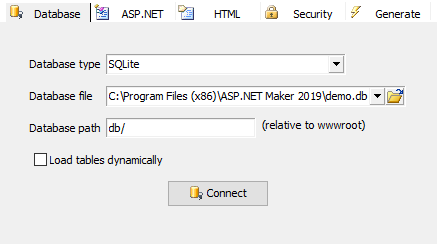
5. SQLite
- Select SQLite as database type,
- Select the SQLite database
file by clicking the
 button,
- Specify the
database path where the database file will reside under the your application root,
- Click the
 Connect button to load the database information.
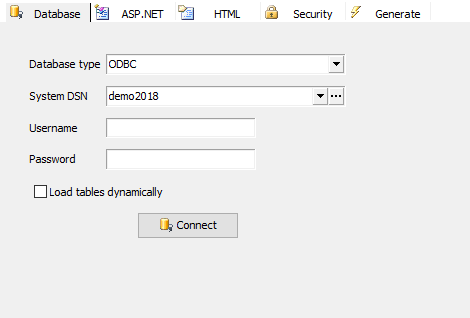
6. Microsoft Access
Notes
- Microsoft Access is not directly supported by .NET Core, connecting via ODBC is required, avoid using it if possible. Migrating Access database to other database such as SQL Server or MySQL is recommended.
- Since ASP.NET Maker is 32-bit, x86 version of database drivers are required, see System Requirements. However, you can use either x86 or x64 .NET Core to run the application.
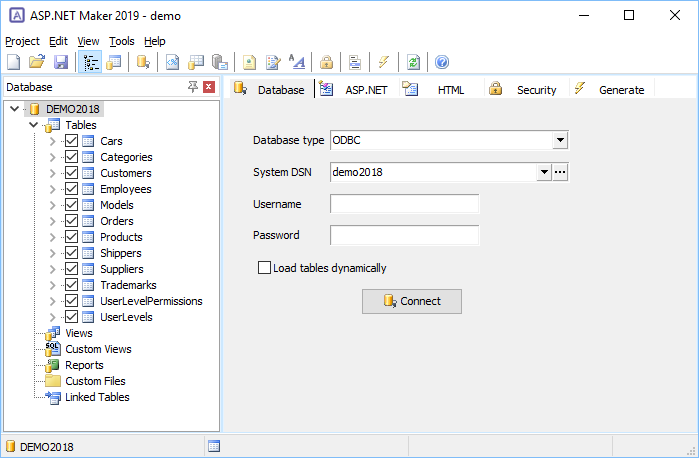
- Select ODBC as database type,
- Select the available data sources for System DSN,
- Click the
 Connect button to load the database information.
On completion, the
tables and fields information will be loaded and displayed on the left
hand side.
The database
pane is dockable. If you prefer to display the database pane on the right
hand side, simply drag it to the right side.
Dynamic Table Loading
By default all tables are loaded upon first connection. It is convenient but loading and synchronization could be slow if your database contains a large number of tables or fields. In such cases you can choose to load the tables dynamically, a table will only be loaded when you select it in the database pane. If you just use a few tables out of a large database, this feature enables you to work much faster. To enable this feature, simply check [Load tables dynamically] before pressing the [Connect] button.


![]() icon in the toolbar to go to [Database] tab. ASP.NET Maker can connect to Microsoft Access, Microsoft SQL Server, MySQL, PostgreSQL, Oracle and SQLite.
icon in the toolbar to go to [Database] tab. ASP.NET Maker can connect to Microsoft Access, Microsoft SQL Server, MySQL, PostgreSQL, Oracle and SQLite. 


